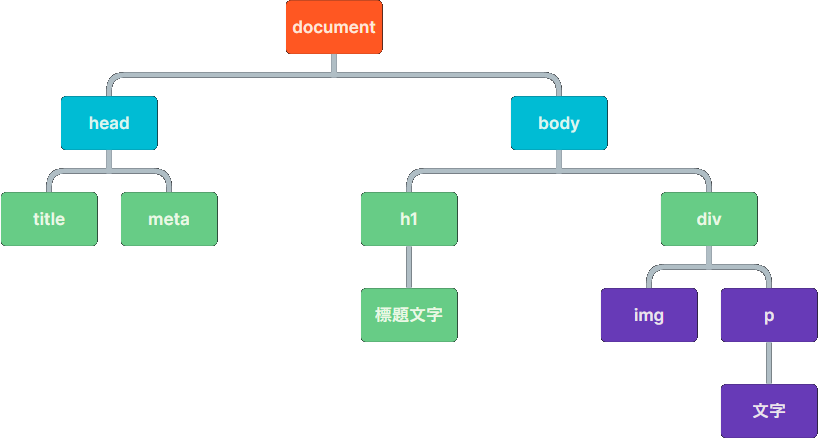
DOM
DOM 全名叫 Document Object Model,中文稱 文件物件模型
介紹
DOM 為 BOM 的 document,也就是指整個網頁的 HTML 部分

取得元素
document代表整個網頁document.documentElement代表整個網頁的根元素,也就是<html>document.head代表<head>document.body代表<body>.getElementById(id)透過 id 抓取一個元素.getElementsByTagName(標籤名)透過標籤名稱抓取所有元素.getElementsByClassName(class名)透過 class 抓取所有元素.querySelector(選擇器)透過 CSS 選擇器抓取第一個元素.querySelectorAll(選擇器)透過 CSS 選擇器抓取所有元素
TIP
建議取得元素時使用 const 宣告,變數名稱設定跟元素名稱一樣,避免自己混淆
const title = document.getElementById("title")TIP
這些語法可以串聯使用,就可以取得更深層的元素
document.getElementById('main').getElementsByClassName('test')注意
迴圈取得的元素時,無法使用 陣列.forEach
因為取得的資料型態是 HTMLCollection,不是單純的陣列
但還是可以使用 for、for of、for in 迴圈處理
// 取得 id 為 header 的元素
document.getElementById("header")

// 取得所有 h1 標籤,結果會是陣列
document.getElementsByTagName("h1")

// 取得所有 class 為 text-center 的所有元素,結果會是陣列
document.getElementsByClassName("text-center")

// 取得所有 class 為 text-center 和 text-white 的元素
document.getElementsByClassName('text-center text-white')

// 使用 CSS 選擇器,取第一個符合的
document.querySelector(".card")

// 使用 CSS 選擇器,取所有符合的,結果會是陣列
document.querySelectorAll(".product")也可以使用這些方法取得相對位置的元素
.parentElement取得上一層元素.children取得下一層所有元素.firstElementChild取得下一層第一個元素.lastElementChild取得下一層最後一個元素.nextElementSibling取得同一層的下一個元素.previousElementSibling取得同一層的上一個元素
Tip
這些語法都只能相對距離為 1 的元素
例如想要取得同一層的下兩個元素,需要串聯語法,或使用迴圈
串連語法範例
const el = document.getElementById('id').nextElementSibling.nextElementSibling迴圈範例
let el = document.getElementById('id')
for (let i = 1; i <= 2; i++) {
  el = el.nextElementSibling
}// parentElement 可以抓取上一層元素
document.getElementById("myLI").parentElement;
// children 可以抓取下一層所有元素
document.getElementById("myUL").children;
// firstElementChild 可以抓取下一層第一個元素
document.getElementById("myUL").firstElementChild;
// lastElementChild 可以抓取下一層最後一個元素
document.getElementById("myUL").lastElementChild;
// nextElementSibling 可以抓取同一層的下一個元素
document.getElementById("item1").nextElementSibling
// previousElementSibling 可以抓取同一層的上一個元素
document.getElementById("item2").previousElementSibling修改元素
.innerText元素內的文字.innerHTML元素內的 HTML.style元素的行內樣式.屬性名元素屬性.setAttribute(屬性名, 值)修改元素屬性.getAttribute(屬性名)取得元素屬性.className取得元素的 class.classList操作元素的 class.add("class")新增 class.remove("class")移除 class.replace("old", "new")取代 class.toggle("class")切換 class,有就移除,沒有就新增.contains("class")是否有 class
TIP
.style 只能取得行內樣式
如果要取得最終樣式,需使用 getComputedStyle(元素, 偽元素).樣式名 取得最終樣式
需要注意這個方式取得的資訊是唯讀的,無法修改
取得樣式範例
const title = document.getElementById('title')
const titleColor = getComputedStyle(title).color取得偽元素樣式範例
const link = document.getElementById('link')
const linkAfterColor = getComputedStyle(link, '::after').color注意
修改獲取得元素屬性時,使用 .屬性名 比用 setAttribute 和 getAttribute 的處理速度快
// 取得元素內的文字
console.log(element.innerText)
// 修改元素內的文字
element.innerText = "123"
// 取得元素內的 HTML
console.log(element.innerHTML)
// 修改元素內的 HTML
element.innerHTML = "<h1>123</h1>";

// 取得元素 CSS
console.log(element.style.backgroundColor)
// 修改元素 CSS
element.style['background-color'] = "red";

// 取得元素屬性
const href = element.getAttribute("href")
console.log(href)
console.log(element.href)
// 修改元素屬性
element.setAttribute("href", "https://kento520.tw")
element.href = "https://kento520.tw"

// 直接取得元素 class
console.log(element.className)
// 直接修改元素 class
element.className = 'text-red text-center'

// 使用 classList 新增 class
element.classList.add("text-italic")
element.classList.add("bg-black", "text-white")
// 使用 classList 移除 class
element.classList.remove("text-italic");
element.classList.remove("bg-black", "text-white");
// 使用 classList 取代 class
element.classList.replace("text-red", "text-blue");
// 使用 classList 切換 class
element.classList.toggle("red");元素移動
document.createElement(標籤名)新增一個元素,需另外使用語法插入 DOM.appendChild(元素)、.append(元素)在內部最後面插入元素.prepend(元素)在內部最前面插入元素.replaceChild(新元素, 舊元素)在內部替換元素.insertBefore(新元素, 參考元素)在內部最前面插入一個元素,並指定插入位置,用於新增或移動元素- 參考元素為 null 時,等同於
appendChild
- 參考元素為 null 時,等同於
.insertAdjacentHTML(位置, HTML)在元素內指定位置插入 HTMLbeforebegin元素前標籤之前afterbegin元素前標籤之後beforeend元素後標籤之前afterend元素後標籤之後
.remove()移除元素.removeChild(子元素)移除元素內的子元素,回傳被刪除的元素
TIP
.append()和.prepend()可以一次放入多個元素或文字.appendChild()只能放入一個元素
const p = document.createElement("p")
element.append(p, 'Text1', 'Text2')

const div = document.createElement("div")
element.appendChild(div)TIP
當 HTML 元素非常多時,使用 .innerHTML 的速度會比這些語法慢
因為 .innerHTML 需要對整個元素重新解析,而這些語法只需要對單一元素操作
const p = document.createElement("p")
element.appendChild(p)

const div = document.createElement("div")
element.replaceChild(div, p).insertBefore() 搬移範例
insertAdjacentHTML 範例
節點
Node 節點物件是 DOM 內所有東西的通用名稱,包含文字、註解以及元素等等
上面所有的 Element 元素物件都是 Node 的一種,代表元素
操作的時候要注意 Node 包含了所有東西,Element 只包含元素
節點類型
| 名稱 | 數值 |
|---|---|
| ELEMENT_NODE | 1 |
| ATTRIBUTE_NODE | 2 |
| TEXT_NODE | 3 |
| CDATA_SECTION_NODE | 4 |
| PROCESSING_INSTRUCTION_NODE | 7 |
| COMMENT_NODE | 8 |
| DOCUMENT_NODE | 9 |
| DOCUMENT_TYPE_NODE | 10 |
| DOCUMENT_FRAGMENT_NODE | 11 |
注意
程式碼排版的縮排空格也算是 Node.TEXT_NODE
Node 相關語法
.nodeType取得節點類型.nodeName取得節點名稱.nodeValue取得節點值.childNodes取得所有子節點.firstChild取得第一個子節點.lastChild取得最後一個子節點.nextSibling取得下一個同一層節點.previousSibling取得上一個同一層節點.parentNode取得上一層節點document.createTextNode(文字)新增一個文字節點
<div id="example-div"><!-- 註解--><p id="example-p">123456</p></div>// 取得 div 內第一個節點的類型,為註解
const div = document.getElementById("example-div")
console.log(div.firstChild.nodeType) // 8
console.log(div.firstChild.nodeType === Node.COMMENT_NODE) // true
// 取得 p 內第一個節點的類型,為文字
const p = document.getElementById("example-p")
console.log(p.nodeType === Node.ELEMENT_NODE) // true
console.log(p.firstChild.nodeType === Node.TEXT_NODE) // true綜合練習
練習
製作倒數計時器
- 使用者用
prompt()輸入秒數數字 - 在網頁只能有一行字顯示
剩餘 X 秒,秒數不能變負數,顏色為藍色 - 時間到時文字變成紅色的
時間到