基礎 Vue.js
認識 Vue 與基礎 Vue.js 語法
介紹影片
工具
- Volar VSCode 擴充功能
- Vue.js devtools 瀏覽器擴充功能
架構
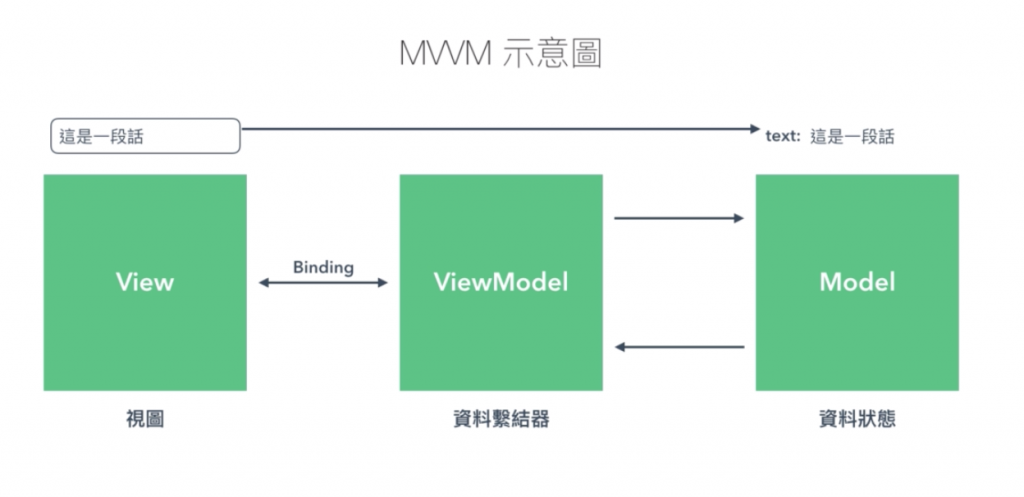
Vue 的開發概念是把網頁轉換成一個一個的元件,拼湊出網頁
與 jQuery 最大的不同是使用 MVVM 的概念開發網頁,在開發 Vue 網頁時不需要寫 ViewModel
View視圖ViewModel資料繫結器,用於連結視圖和資料Model資料
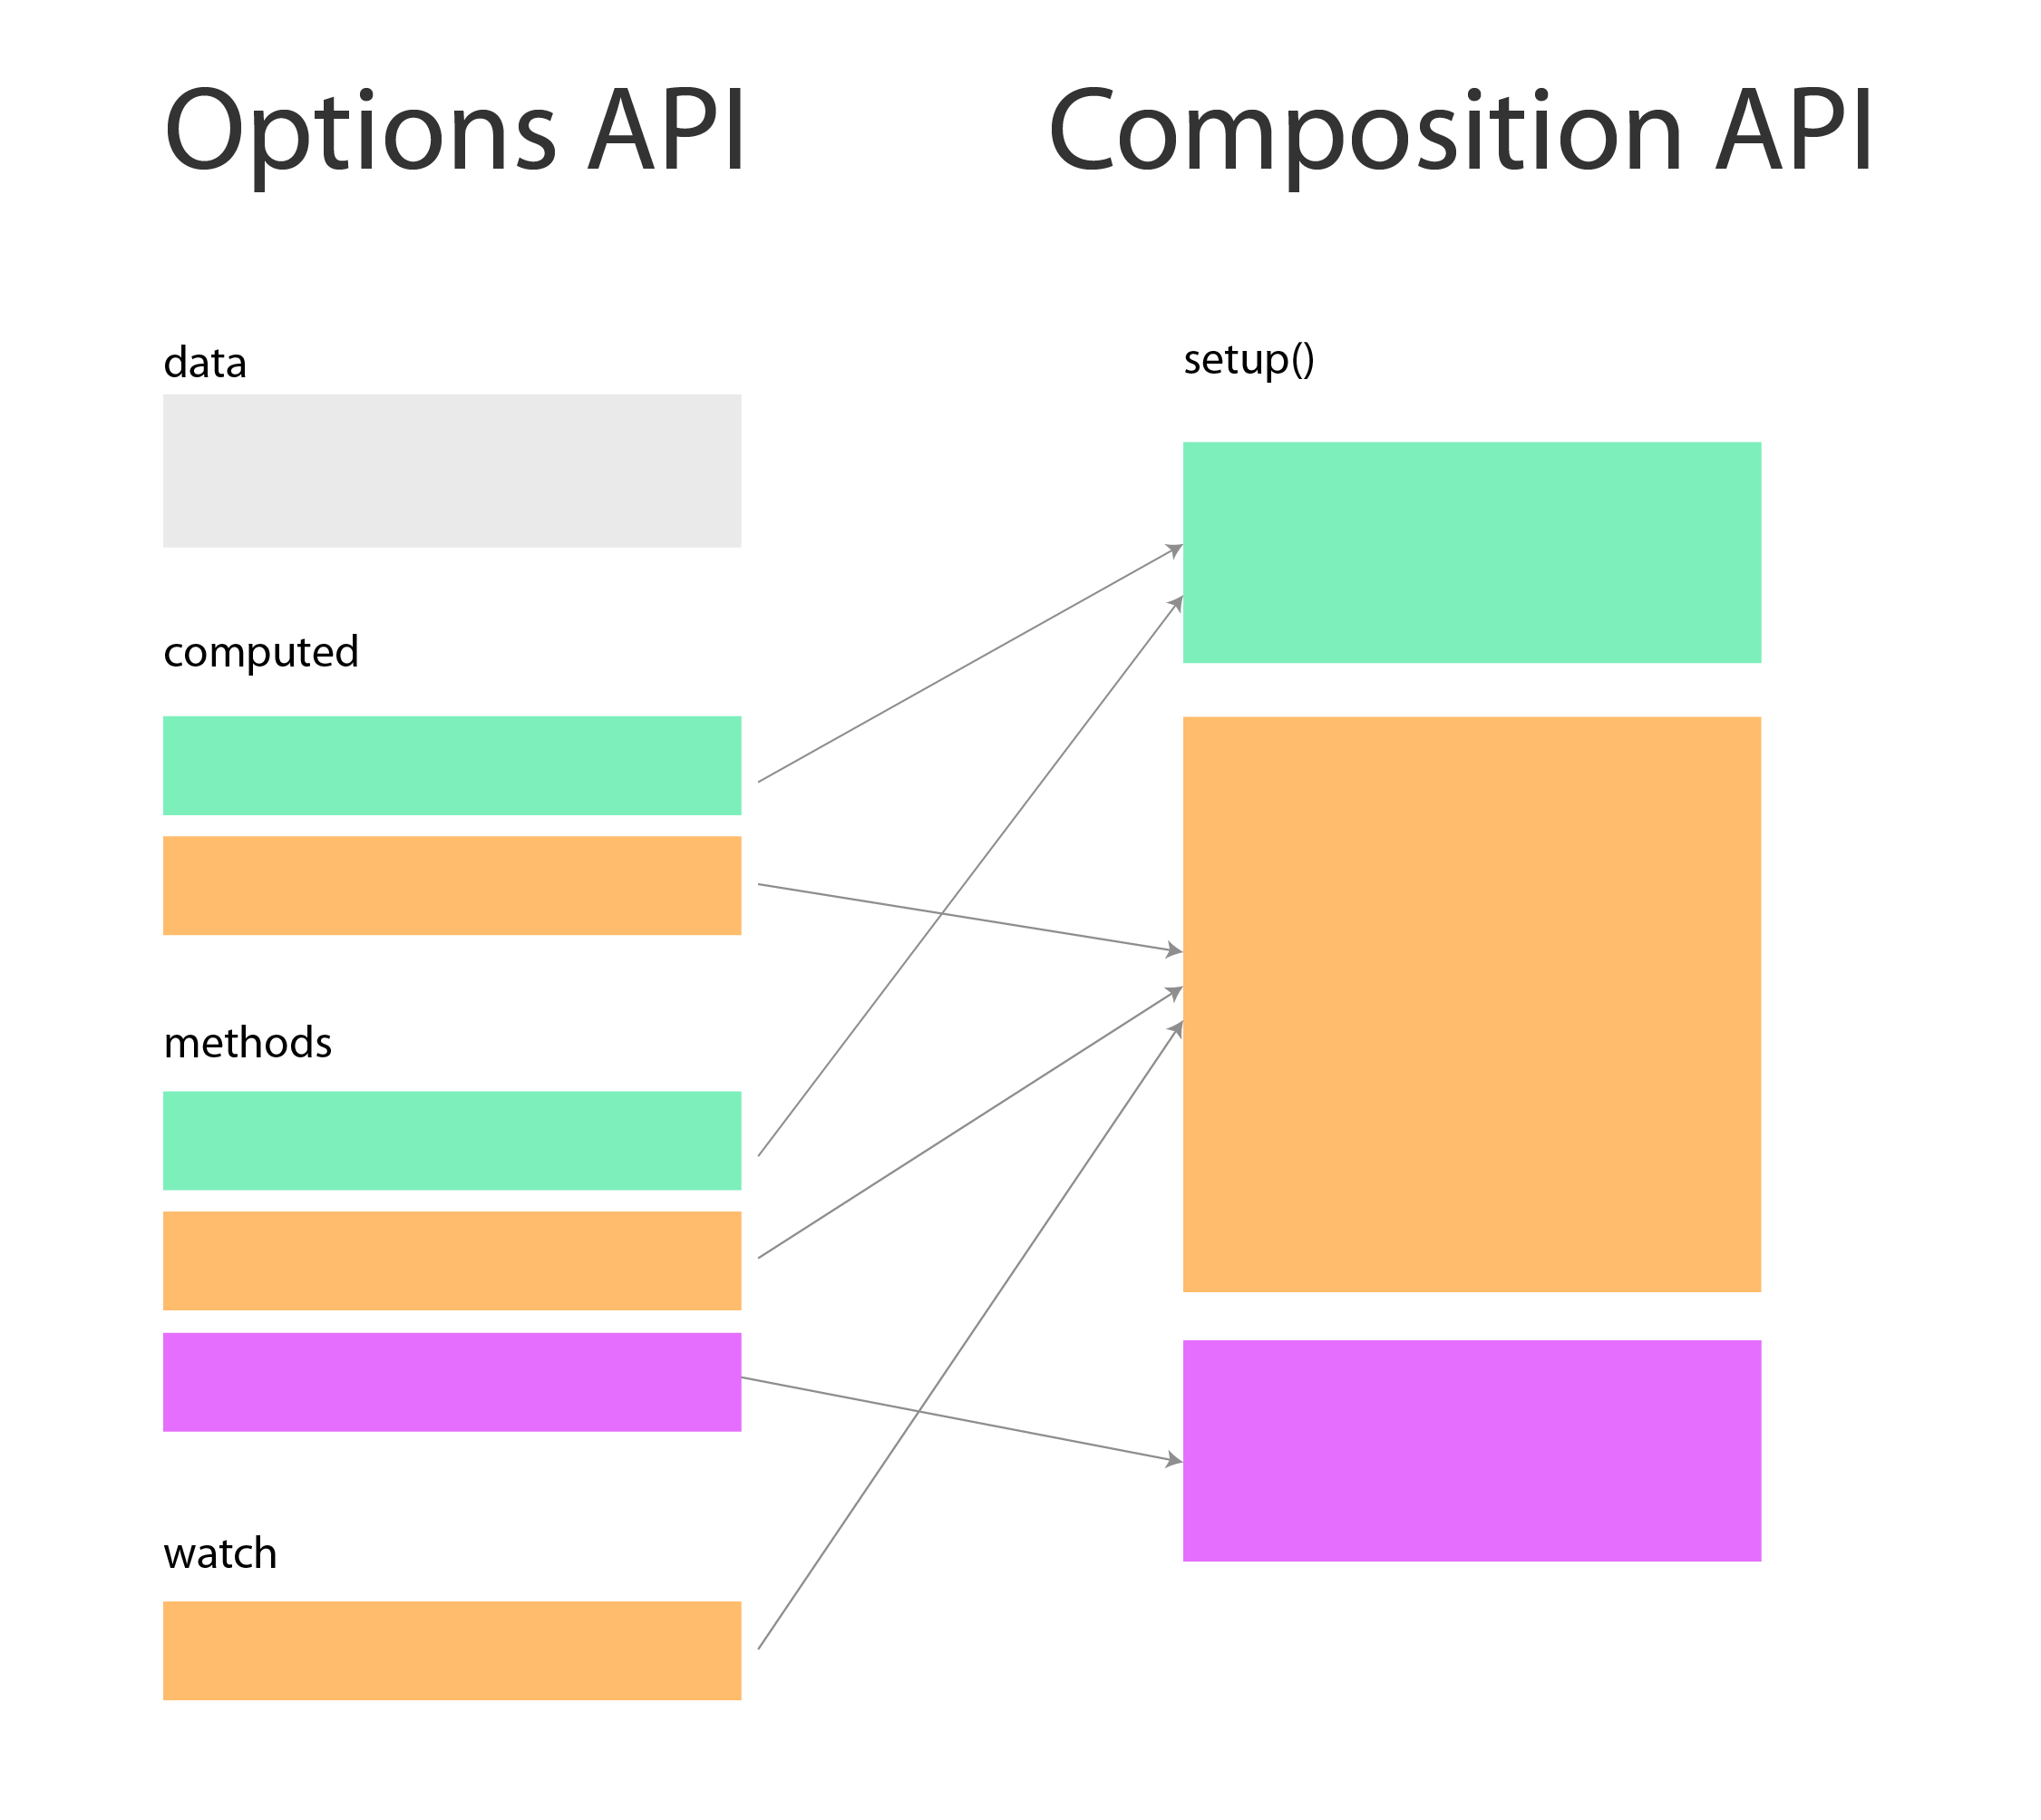
JavaScript 語法分為兩種,Options API 和 Composition API 兩種
Options API是 Vue 2 的語法,將元件的資料、function、生命週期等分開寫在不同區塊Composition API是 Vue 3 的新語法,將所有元件的邏輯全部放到setup()裡面,方便管理
TIP
課程以 Vue 3 和 Composition API 為主
若使用的是 Vue 2,2.7 以前需安裝 @vue/composition-api
基本架構
html
<div id="app">
  <!-- HTML 部分 -->
</div>

<script>
Vue.createApp({
  setup () {
  },
  data () {
    return {}
  },
  methods: {}
}).mount('#app')
</script>HTML 語法
- 模板語法和標籤的
v-text可以將資料以文字方式輸出html<!-- {{ }} 裡面放 data 的名稱可以顯示文字 --> {{ name }} 的座號是 {{ number }} <span v-text="name"></span> v-html屬性可以將資料以 HTML 輸出html<!-- v-html 放 html 文字的 data 可以顯示 HTML --> <span v-html="html"></span>- 標籤內判斷式,符合條件才出現html
<!-- 符合條件才出現在 DOM --> <p v-if="number == 1">number 為 1</p> <p v-else-if="number == 2">number 為 2</p> <p v-else>number 為 其他數字</p> <!-- 符合條件才顯示,不符合時是 display:none --> <p v-show="number == 1">number 為 1</p> - 標籤內迴圈html
<ul> <!-- v-for="(值, 索引) in 陣列" --> <li v-for="(fruit, index) in fruits"> {{ fruit }} </li> </ul> - 綁定屬性,使用
v-bind:屬性或是:屬性html<!-- <img v-bind:src="image" height="100px"> --> <img :src="image" height="100px"> <!-- 綁定 style,裡面要放 json,key 是樣式名,value 是 data --> <img :src="image" :style="{border: '10px solid red'}" height="100px"> <img :src="image" :style="{border: redBorder}" height="100px"> <img :src="image" :style="myborder" height="100px"> <!-- 綁定 class,裡面要放 json,key 是 class 名,value 是 true 或 false --> <p :class="{big: true, red: false}">123</p> <!-- v-model 綁定輸入欄位的 value --> <input type="text" v-model="modeltext"> <!-- checkbox 和 radio 以 v-model 分組, v-model 是使用者選的值,value 是欄位的值--> <input type="checkbox" v-model="checkValue" :value="1"> <input type="checkbox" v-model="checkValue" :value="2"> <input type="radio" v-model="radioValue" :value="1"> <input type="radio" v-model="radioValue" :value="2"> - 事件,使用
v-on:事件或是@事件
事件有.prevent.stop修飾符可以用
鍵盤事件則有按鍵修飾符,如@keydown.enter和@keydown.13html<!-- 如果沒有要傳資料,可以只寫 function 名 如果 v-on 呼叫 function 時只寫名字,仍會收到一個 event 物件 --> <input type="button" value="新增" @click="add"> <input type="text" v-model="modeltext" @keydown.enter="add"> <!-- 如果可以帶資料進去時需要 event 事件的話 需要使用 $event 變數 --> <input type="text" @keydown.enter="print('hi', $event)">
Composition API
js
// 用解構方式提取需要的東西
const { ref, reactive, computed, onMounted, watch } = Vue

Vue.createApp({
  // setup 可以代入兩個東西
  // props 代表傳入元件的 props
  // context 就是元件本身
  setup(props, context) {
    // 只有 HTML 有使用到的變數才需要 ref 與 reactive 綁定
    // ref() 可接受所有種類的資料型態,但是不會偵測陣列和物件內部的變化
    // 需要取值時寫成 變數名.value
    const firstName = ref('小明')
    const lastName = ref('王')
    // reactive() 只能接受陣列和物件,會偵測陣列和物件內部變化
    // 使用時不需要 .value
    const obj = reactive({
      name:1,
      age:2,
      job: {
        j1: {
          salary: 3
        }
      }
    })

    // computed
    const fullName = computed(() => {
      return lastName.value + firstName.value
    })

    // methods 直接寫一般的 function 就好
    const sayHello = () => {
      console.log('你好,我是' + fullName.value)
    }

    // 觸發事件的 $emit 寫法不一樣
    const emitEvent = () => {
      context.emit('customEvent', 'someValue')
    }

    // 偵測 ref 變更
    watch(firstName, (newValue, oldValue) => {
      console.log(newValue, oldValue)
    })

    // 偵測 reactive 全部屬性變更,無法取得 oldValue
    watch(obj, (newValue, oldValue) => {
      console.log('obj 變更', newValue, oldValue)
    })
    // 偵測 reactive 內一個屬性的變更,可以取得 oldValue
    watch(() => obj.name, (newValue, oldValue) => {
      console.log('obj.name 變更', newValue, oldValue)
    })
    // 偵測 reactive 內多個屬性的變更,可以取得 oldValue
    watch([() => obj.name, () => obj.age], (newValue, oldValue) => {
      console.log('obj.name 和 obj.age 變更', newValue, oldValue)
    })
    // 偵測 reactive 內屬性的變更,若屬性是 Object 的話需要 deep: true
    watch(() => obj.job, (newValue, oldValue) => {
      console.log('obj.job 變更', newValue, oldValue)
    }, { deep: true })

    // 生命週期相關的直接寫,不用回傳
    onMounted(() => {
      console.log('mounted')
    })

    // 只有 HTML 有使用到的 function 與變數才需要傳出去
    return {
      firstName,
      lastName,
      fullName,
      sayHello,
      emitEvent
    }
  }
}).mount('#app')生命週期
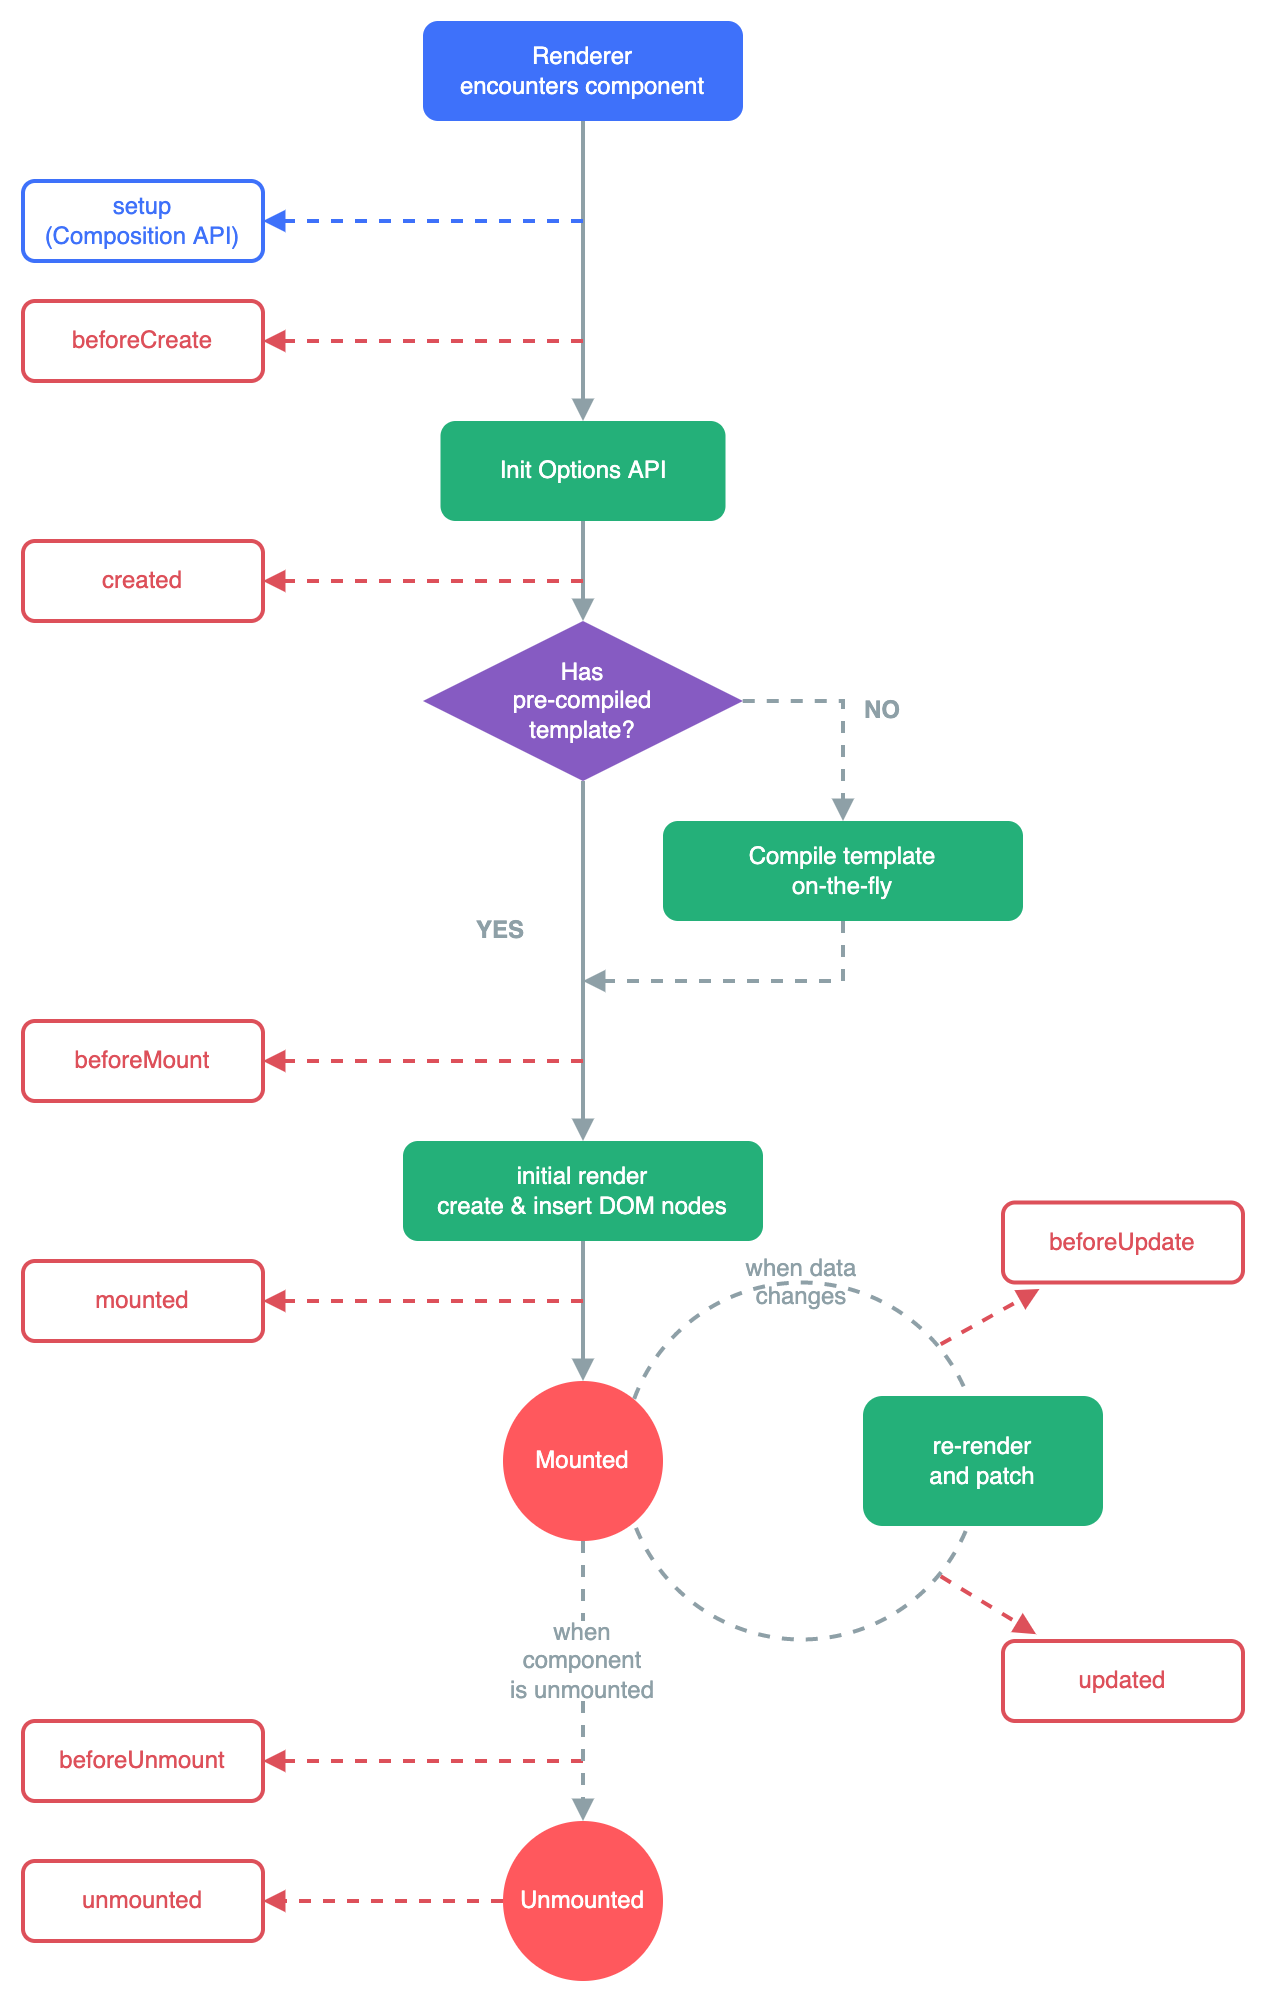
比較需要注意的生命週期有:
createdVue 元件被建立,無法存取 DOMmountedVue 元件被建立,可以存取 DOMunmountedVue 元件被銷毀時,如果有 setTimeout、setInterval 時需要在這時 clearTimeout、clearInterval,否則元件被銷毀仍然會執行
注意
Composition API 生命週期名稱和 Options API 不同,沒有 created
存取 HTML 元素
ref 可以綁定元素或元件,類似 document.getElementById()
注意
ref 取到的元素預設值是 nullmounted 生命週期後才有值
注意
若要存取的元素上有使用 v-if 判斷,且要在出現時存取
需等下次 Vue 渲染完 DOM,否則可能會抓取不到
js
const { nextTick } = Vue
await nextTick()html
<h1 ref="mytext">文字文字</h1>js
setup () {
  const mytext = ref(null)
  // Vue 3.5
  // const mytext = useTemplateRef('mytext')
  console.log(mytext.value.innerText)
  return {
    mytext
  }
}練習
練習
製作一個購物清單
- 兩個字以上才能新增
- 新增欄位邊框小於兩個字時是紅色,成功是藍色,空白是黑色
- 已完成打勾
- 可以保存資料到
localStorage - 個別刪除、全部刪除
- 全部標記已完成、全部未完成
作業
製作進階待辦清單,必須要有下列功能:
- 新增功能,兩個字以上才能新增
- 小於兩個字時輸入欄位邊框是紅色,成功時是藍色,空白時是黑色
- 每個項目有 checkbox 可以打勾標記已完成或未完成,完成的項目文字必須要有刪除線
- 可以個別刪除清單項目
- 可以將清單資料保存到
localStorage - 可以點兩下清單項目開啟編輯欄位
- 在編輯欄位按
ENTER可以儲存編輯 - 在編輯欄位可以按
ESC鍵可以取消編輯 - 可以點按鈕過濾顯示全部項目、已完成項目、未完成項目
- 可以顯示目前過濾的方式及過濾後的項目總數
- 可以點按鈕一次刪除全部項目、已完成項目、未完成項目
- 可以點按鈕將所有項目標記為已完成
- 可以點按鈕將所有項目標記為未完成
提示:
- 點兩下的事件為
@dblclick - 按
ESC鍵的,事件為@keydown.esc - 過濾可以使用
computed搭配.filter()
