元件
元件是一個可重複使用的區塊,可以將一個功能或一個區塊獨立成元件,方便管理及重複使用
基本語法
可以將網站中重複使用的區塊獨立成元件,例如商品卡片等,方便重複使用
也可以將頁面的各個區塊獨立成元件,拆分頁面,方便維護 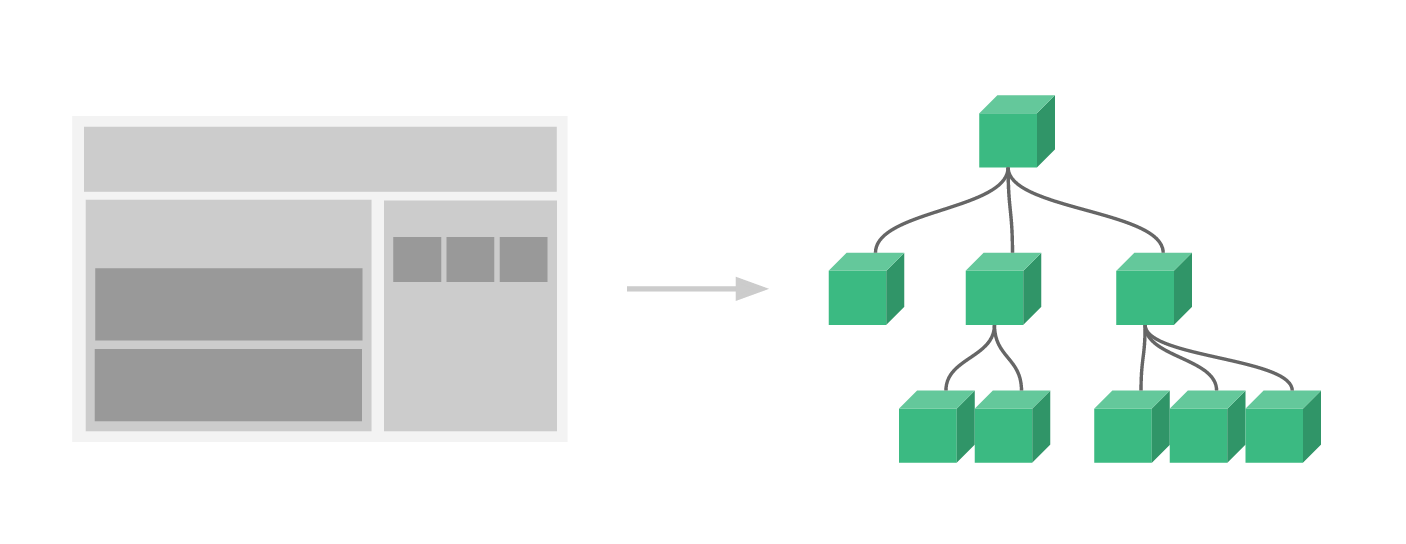
html
<div id="app">
  <!--
    使用元件名稱當作標籤
    元件可以重複使用
  -->
  <counter></counter>
  <counter></counter>
  <counter></counter>
</div>

<!-- 宣告元件的 HTML 部分 -->
<script type="text/x-template" id="counter">
  <button @click="count++">你點擊了 {{ count }} 次</button>
</script>js
const app = Vue.createApp({
  // ...略
})
app.component('counter', {
  // 指定模板 script id
  template: '#counter',
  // 或是直接定義 html
  template: `
    <button @click="count++">你點擊了 {{ count }} 次</button>
  `,
  // 元件資料
  data() {
    return {
      count: 0
    }
  }
  // ...其他
})
app.mount('#app')props
使用 props 將資料傳入元件
如果剛好資料是物件,且 key 與 props 名稱相同,可以使用 v-bind 一次傳入
注意
props是單向綁定,元件內只能讀取不能修改- 注意資料型態,沒有使用
v-bind:xxx或:xxx時會是文字html<!-- 元件內收到的 price 是文字,quantity 是數字 --> <product price="100" :quantity="50"></product> - 資料型態是布林值時,有寫就是 true,沒寫就是 falsehtml
 <!-- 元件內收到的 sell 是 true -->
 <product sell></product>
 <!-- 元件內收到的 sell 是 false -->
 <product></product>
html
<product
  v-for="product in products"
  :quantity="product.quantity"
  :price="product.price"
  :sell="product.sell"
  :name="product.name"
></product>

<product
  v-for="product in products"
  v-bind="product"
></product>js
const { toRef, toRefs } = Vue

app.component('product', {
  props: {
    // 指定資料型態
    quantity: Number,
    sell: {
      type: Boolean,
    },
    // 指定資料型態 + 必填
    name: {
      type: String,
      required: true,
    },
    // 指定資料型態 + 預設值 + 驗證
    price: {
      type: Number,
      required: true,
      default() {
        return 100
      },
      validator(value) {
        return value >= 0
      },
    },
  },
  setup (props) {
    // 直接使用 props
    console.log(props.name)

    // 整個 props 轉成 refs 並解構
    const { name } = toRefs(props)

    // 或是單獨轉成 ref 使用
    const name = toRef(props, 'name')

    console.log(name.value)
  }
})emit
子元件傳出則需要使用 emit()
html
<!-- 外層 -->
<my-component @apple="handleApple"></my-component>
<!-- 子元件內 -->
<input type="button" @click="onBtnClick" value="點我">元件觸發
js
const app = Vue.createApp({
  setup() {
    // 外部處理,會收到傳出的值
    const handleApple = (value) => {
      console.log(value) // 'abcd'
    }
    return {
      handleApple
    }
  }
}).component('my-component', {
  setup(props, { emit }) {
    // 子元件觸發自訂義事件,名稱為 apple,將 'abcd' 帶出去
    const onBtnClick = () => {
      emit('apple', 'abcd')
    }
    return {
      onBtnClick
    }
  }
}).mount('#app')v-model
使用 v-model 搭配 computed 實現雙向綁定
html
<my-component v-model:title="title"></my-component>js
app.component('my-component', {
  props: {
    title: String
  },
  setup (props, { emit }) {
    const syncTitle = computed({
      get () {
        return props.title
      },
      set (value) {
        emit('update:title', value)
      }
    })
    return { syncTitle }
  }
})在 Vue 3.4 以後的 SFC 可以使用 defineModel 簡化
html
<script setup>
  // 在 <script setup> 標籤內才可使用
  // defineModel(prop名, prop選項)
  const title = defineModel('title', { required: true })
</script>Event Bus
若需要子元件互傳,或是距離很遠的元件間傳遞資料,需使用 Event Bus
Vue 官方建議使用
TIP
- Vue 2 可以另外建立一個 Vue 實例當作 Event Bus,但 Vue 3 不支援這種用法
- Quasar Framework 有內建 Event Bus
js
const emitter = mitt()

app.component('component1', {
  setup () {
    const count = () => {
      emitter.emit('sayhi', 'hi')
    }
    return {
      count
    }
  }
})
app.component('component2', {
  setup () {
    onMounted(() => {
      emitter.on('sayhi', e => {
        console.log(e)
      })
    })
  }
})provide/inject
provide/inject 可以讓上層元件提供資料給下層元件使用
不需要一層一層傳遞 props 或 emit,適合用在元件層級較深的情況
TIP
provide/inject 在元件比較多層時可能會難以追蹤資料來源,不建議使用
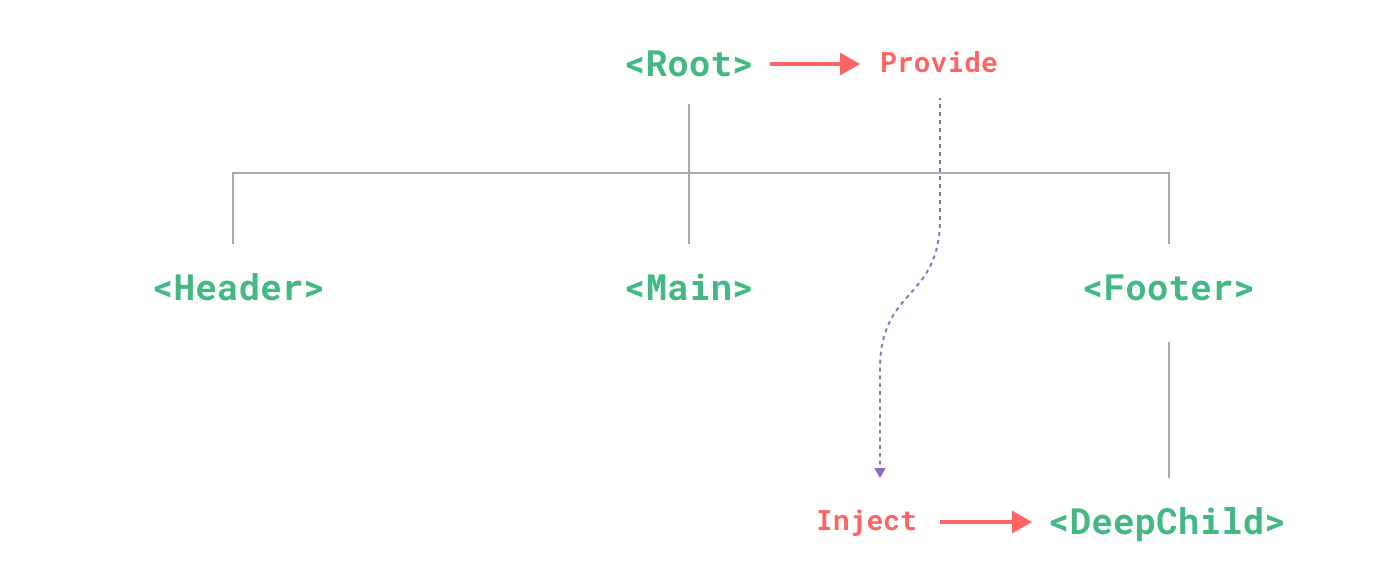
上層使用 provide
js
const { provide, ref } = Vue

setup () {
  const message = ref('abcd')
  provide('message', message)
}子元件就能使用 inject 取得資料
js
const { inject } = Vue

setup () {
  const message = inject('message')
  console.log(message.value)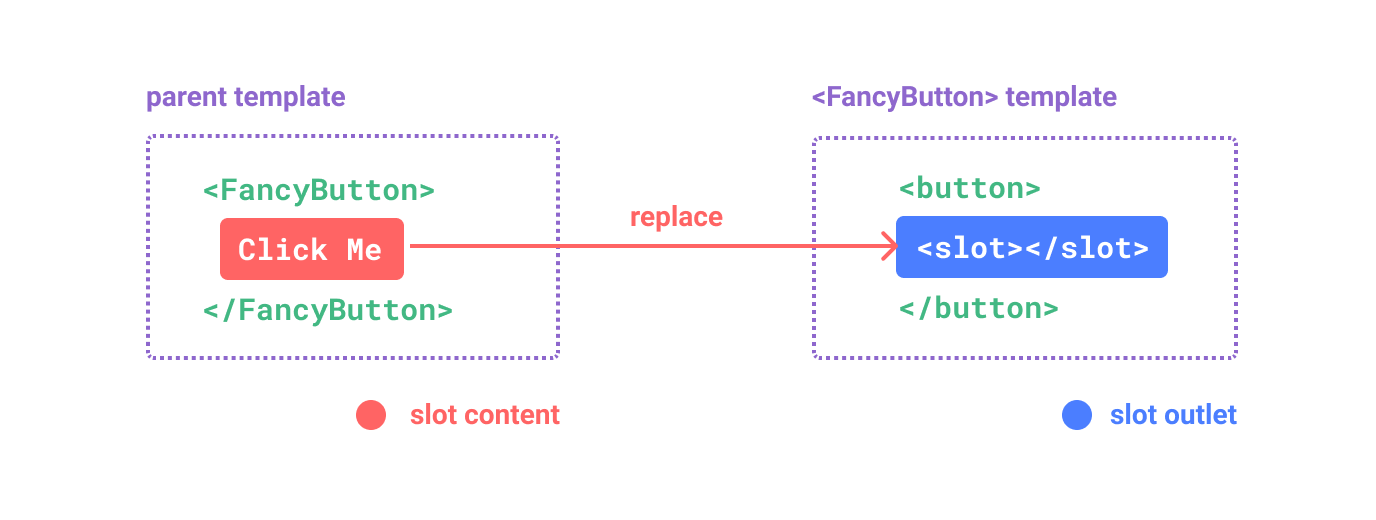
}插槽
插槽可以在元件內預留一部分的 HTML 給呼叫元件的地方使用
在元件內用 slot 標籤,讓該部分的 HTML 由呼叫元件的地方自訂slot 標籤內的東西會在沒有使用插槽時顯示 ,也可以不放東西
html
<button>
  <slot>送出</slot>
</button>使用元件時將內容放進元件標籤內即可
html
<my-component>按鈕</my-component>使用多個 slot 時必須要給插槽名字
html
<button>
  <h1>
    <slot name="title">標題</slot>
  </h1>
  <p>
    <slot name="description">內文</slot>
  </p>
</button>使用元件時將內容放進 template 標籤內即可
html
<my-component>
  <template v-slot:title>
    ABCDEFG
  </template>
  <!-- v-slot: 可以縮寫為 # -->
  <template #description>
    1234567
  </template>
</my-component>若要在插槽內使用元件內的資料,必須將資料綁定到 slot 標籤
html
<button>
  <h1>
    <slot name="title" :data="someData" :data2="someData2"></slot>
  </h1>
</button>使用時將資料解構出來
html
<my-component>
  <template #title="{data, data2}">
    ABCDEFG
  </template>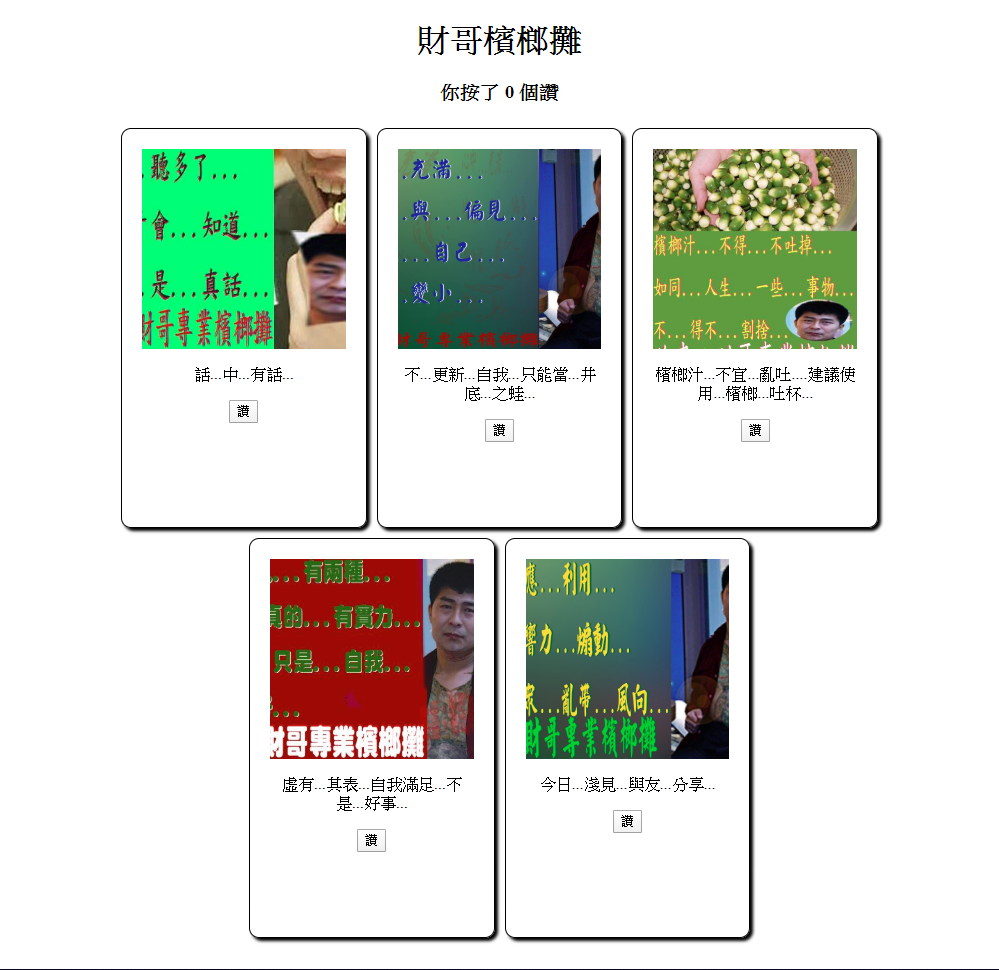
</my-component>練習
練習
製作一個卡片收集頁
- 卡片需用子元件製作,包含圖片、文字及按讚、收回讚按鈕
- 需要有 5 張以上排列
- 外層可以統計總共按了幾個讚